

Tools
Format, clean up and check a contract with one click, without using the assistant.
The Tools tab holds formatting and clean-up tools. They work on the open document straight away, without a chat.
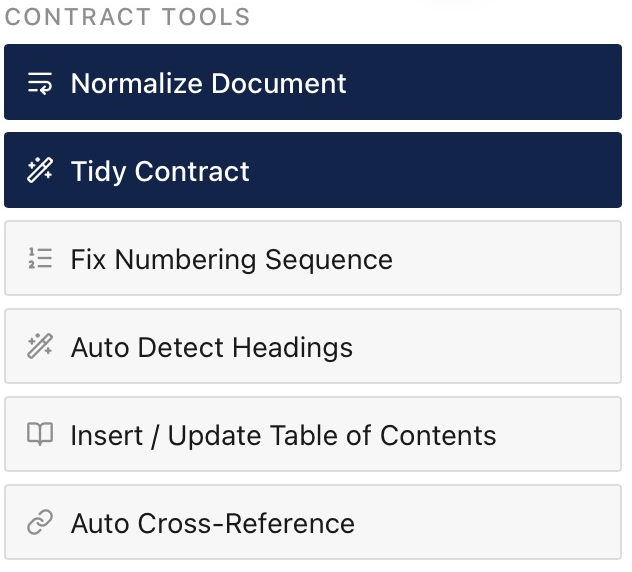
Many tools can be reverted. After a tool runs, the pane shows how many paragraphs changed, with a Revert button.
Normalize Document
Use this on plain text with a line break at the end of each line, such as an SEC filing or text copied from an email. It joins the lines into paragraphs and removes page numbers.
- Click Normalize Document. The pane reads the document and shows a preview.
- Click Apply.
- Check the result. Click Revert to undo it, or Next: Tidy Contract to continue.
The pane checks the wording after the change and tells you it is unchanged. If the document does not look like plain text, the pane says so.
Tidy Contract
Use this to give a contract one clean format in one go.
- Click Tidy Contract. The pane reads the document and shows a preview.
- Choose what to change.
- Click Apply.
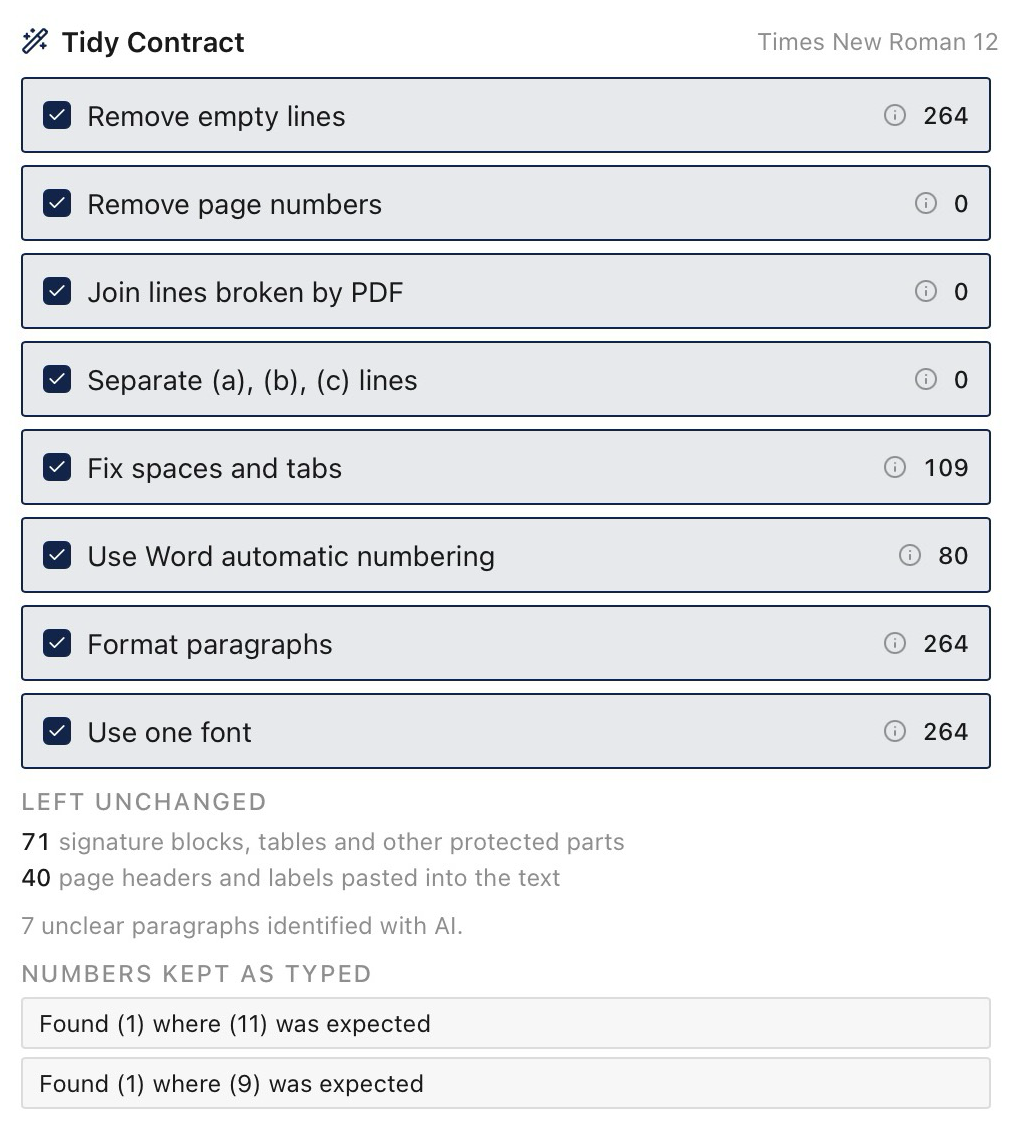
| Option | What it does |
|---|---|
| Remove empty lines | Deletes empty paragraphs. The gap becomes paragraph spacing |
| Remove page numbers | Deletes page numbers typed into the text |
| Join lines broken by PDF | Joins lines cut short by a PDF paste |
| Separate (a), (b), (c) lines | Splits lettered items typed in one paragraph |
| Fix spaces and tabs | Collapses double spaces and puts one tab after each clause number |
| Use Word automatic numbering | Turns typed clause numbers into real Word numbering |
| Format paragraphs | Justifies text and sets indents and line spacing to one grid |
| Use one font | Sets the main font everywhere. Bold and italic stay |
The preview lists any paragraph the tool will leave unchanged. Use Show in document to find it.
If the document has tracked changes, Tidy Contract does not change the text itself. Accept or reject those changes first if you want empty lines, broken lines and spaces fixed.
After a run, the pane checks the wording and tells you it is unchanged. Click Revert to put the document back.
Remove Internal Comments
Run this before you share a document.
- Click Remove Internal Comments. The pane shows how many internal comments the document has.
- Click Remove internal comments.
A comment is internal if it starts with [Internal]. The tool also checks resolved comments and replies. When a comment goes, the replies under it go too. Replies posted from a Comments card with the Internal audience start with [Internal], so the tool finds them.
To keep a comment for the other side, take out the prefix in Word first.
The tool checks the main document text only. Check footnotes, endnotes and notes without [Internal] yourself.
The count does not update by itself. If you undo a removal in Word or add comments, click Check again.
Export Comments
Export Comments puts every comment in the document into one Word or Excel file. Use it to send a list of open points, or to keep a record of who said what. It does not use the assistant and does not change the document.
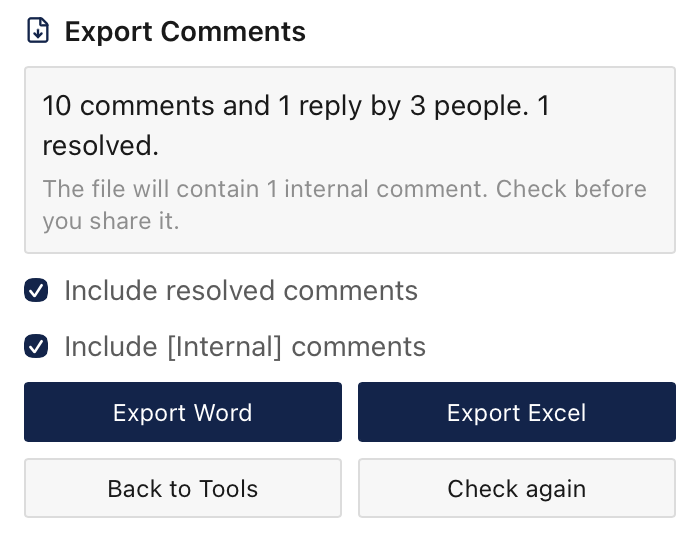
- Click Export Comments. The pane shows how many comments and replies the document has, how many people wrote them, and how many are resolved.
- Choose what to include. Both boxes are ticked at first:
- Include resolved comments
- Include [Internal] comments
- Click Export Word or Export Excel, then save the file.
The file has one row for each comment. Each reply has its own row under its comment, numbered 1.1, 1.2 and so on. The columns are:
- Author: who wrote the comment.
- Date: when they wrote it.
- Clause: the heading the comment sits under, for example "4. Limitation of Liability".
- Commented text: the passage the comment is attached to.
- Comment: the text of the comment or reply.
- Type: Comment or Reply.
- Status: Open or Resolved. A reply has the status of its comment.
The file is named after the document, for example Services Agreement comments 2026-11-10.xlsx.
When internal comments are included, the pane says how many the file will contain. Untick Include [Internal] comments before you export a file for the other side. A comment is internal if it starts with [Internal].
The tool reads comments in the main document text only, not in footnotes or endnotes. If you add or remove comments while the panel is open, click Check again.
Proof
Proof checks a contract for reference and defined-term mistakes. It uses fixed rules, not the assistant, so it gives the same result each time and sends no text to a server.
Use it before you send a draft, or after you add, delete or move clauses.
- Click Proof. The pane reads the document and lists what it found, in groups.
- Click a group heading to open or close it. Long groups start closed, so the headings give you a summary first.
- Click a finding to go to that paragraph in Word.
- For each finding, click Fix, change the text yourself, or click Ignore.
- Click Run again to check the document again.
The line at the top tells you what Proof checked, for example "Checked 12 references against 40 numbered clauses and schedules, and 18 defined terms."
Cross-references
| Group | What it means | What to do |
|---|---|---|
| Missing targets | A reference points to a clause or schedule that does not exist, such as "Clause 9" in a contract with 8 clauses | Correct the number, or add the clause |
| Wrong headings | The heading in brackets is not the heading of that clause, such as "Clause 3 (Fees)" when clause 3 is "Payment" | Click Fix to write the real heading |
Proof reads clause numbers from Word numbering and from numbers typed in the text. If it finds no clause numbers, it tells you that it did not check references.
Defined terms
Proof finds a defined term from a definition such as "Services" means … or Northwind Ltd (the "Supplier"). It also reads a definitions table. It does not find a term that is defined only by bold text.
| Group | What it means | What to do |
|---|---|---|
| Defined more than once | The term has more than one definition | Use the numbered buttons to go to each definition. Keep one |
| Not defined | A capitalised phrase is used 2 or more times, but it has no definition | Add a definition, or write it in lower case |
| Wrong case | A defined term is written in lower case, such as "business days" | Click Fix if you mean the defined term. Otherwise click Ignore |
| Defined but not used | The term is defined, but the contract never uses it | Delete the definition, or use the term |
| Used before definition | The term appears before the place where it is defined | Move the definition up, or check the earlier use |
| Definitions out of order | The definitions are not in alphabetical order | Move the definition |
| Mentioned once | A capitalised phrase is used once and has no definition | Often the name of another document. Check it |
A one-word term, such as "Account", is also an ordinary word: "on account of" does not mean the defined Account. Proof shows these findings in black, not orange, with the text "If this means the defined term". Fix them one at a time. Fix all is only for terms of two or more words.
If one file holds more than one agreement, each agreement can define the same terms. Then "Defined more than once" is expected. Ignore those findings.
Fix and Ignore
Fix makes a tracked change, also if Track Changes is off. Word's Track Changes setting does not change. For a wrong case, only the first letters change, so the markup shows "a" changed to "A".
Ignore hides a finding until you close the pane. To see hidden findings again, click Show again below the list.
Link all references
Link all references turns each reference to an existing clause or schedule into a link. Click the link in Word to go to the clause. The text keeps its colour and has no underline.
A reference to a clause that does not exist stays as plain text. If you click the button again, Proof links only the new references. If the document has no references, the button is grey.
Proof does not change clause numbers
Proof finds a wrong reference but does not renumber it. After you renumber clauses, run Proof again to find references that now point to the wrong clause.
Compare Versions
Compare Versions shows what is different between the open document and an earlier Word file. Use it when the other side sends back a clean draft with no tracked changes, or to check a contract against your template. It does not change the document.
- Click Compare Versions.
- Click Choose file and pick the earlier version or the template. It must be a Word file (.docx).
- The pane lists each paragraph that differs. Each row says Changed, Added, Removed or Moved, names the clause, and marks the words that changed.
- Click Show on a row to go to that paragraph in Word. For removed text, Show place goes to the paragraph before the place where the text was.
- Click Explain changes to send the list to the assistant. It opens the chat and sorts the changes into Important, Notable and Cosmetic, with the clause, the legal effect and which party each change favours.
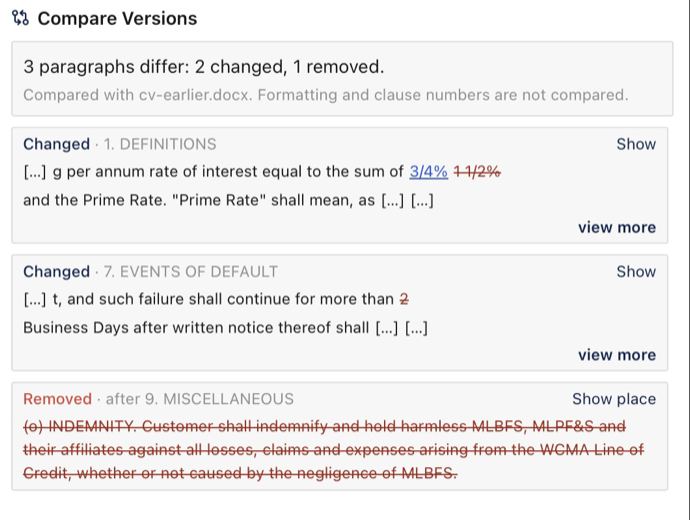
The list is made with fixed rules, not the assistant. No text is sent to a server until you click Explain changes.
For "what changed since we last sent it", choose the file you last sent.
Limits:
- Compare Versions reads the text of the main document only. It does not compare formatting, clause numbers that Word adds, headers, footers, footnotes or text boxes.
- Tracked changes in either file are read as if they were accepted.
- A paragraph that was moved and also edited shows as one Removed row and one Added row.
- If you edit the document while the list is open, choose the file again.
Template Fields
Template Fields turns a signed or negotiated contract into a template, and fills a template from a term sheet. A field is a Word content control: a marked place in the text that holds one value, such as a party name, a date or an amount. The same value in several places is one field, so you change it once.
Make a template
- Open the contract and click Template Fields.
- Click Find fields. The assistant reads the document and the chat shows a Template fields card. Each row is one value that changes from deal to deal, with its name and the number of places it stands in.
- Click the target icon on a row to see the value in the document. Clear the tick box of each value you want to keep as fixed text.
- Click Insert fields. The card says how many fields it made, and lists any value it did not find.
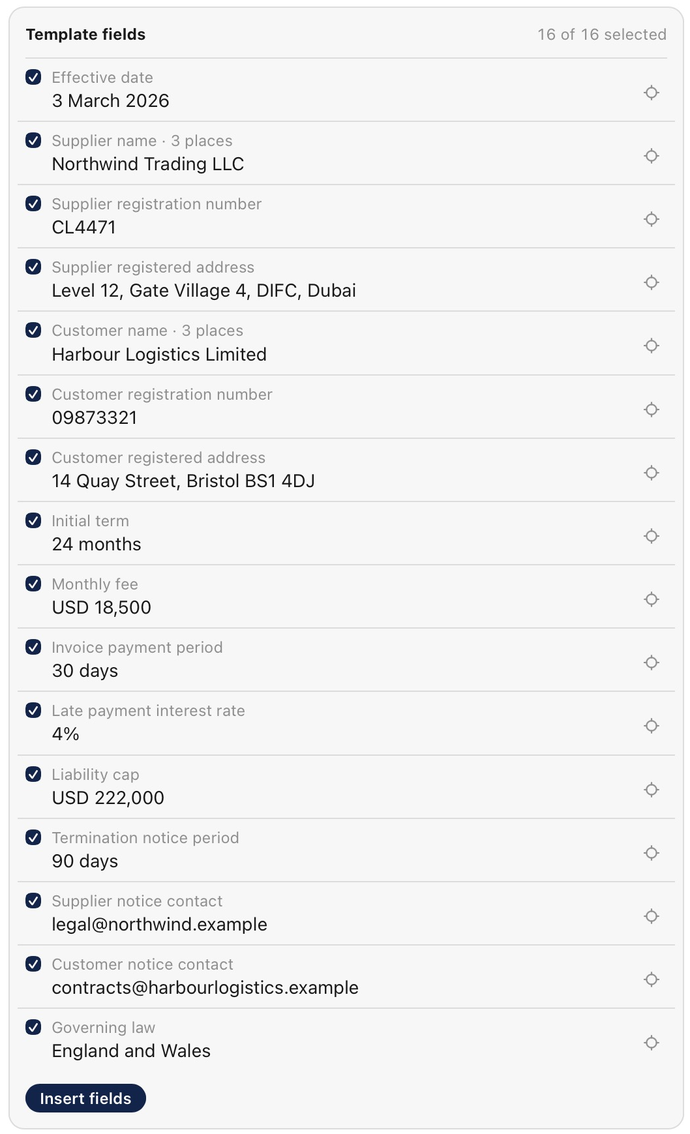
The text of the contract stays the same. In Word, click a value to see the box of its field and its name. Save the document as your template.
Fill a template
- Open the template. In the chat, attach the term sheet, email or other source with the paperclip. You do not need to send it. You can also type the values in a message.
- Click Template Fields, then Fill fields. The chat shows a Fill template card with one box per field and the value the assistant found. Under each box, Now is the text the field holds at present, followed by the source of the new value.
- Check each value against the Now text and correct it in its box. The new value must have the same form: if the field holds "30 days", the value is "45 days", not "45 days from invoice". A box that says No value found is a value the source does not give: type it, or leave the box empty to keep the field as it is.
- Click Fill fields. The card says how many fields it filled and lists the ones it left empty.
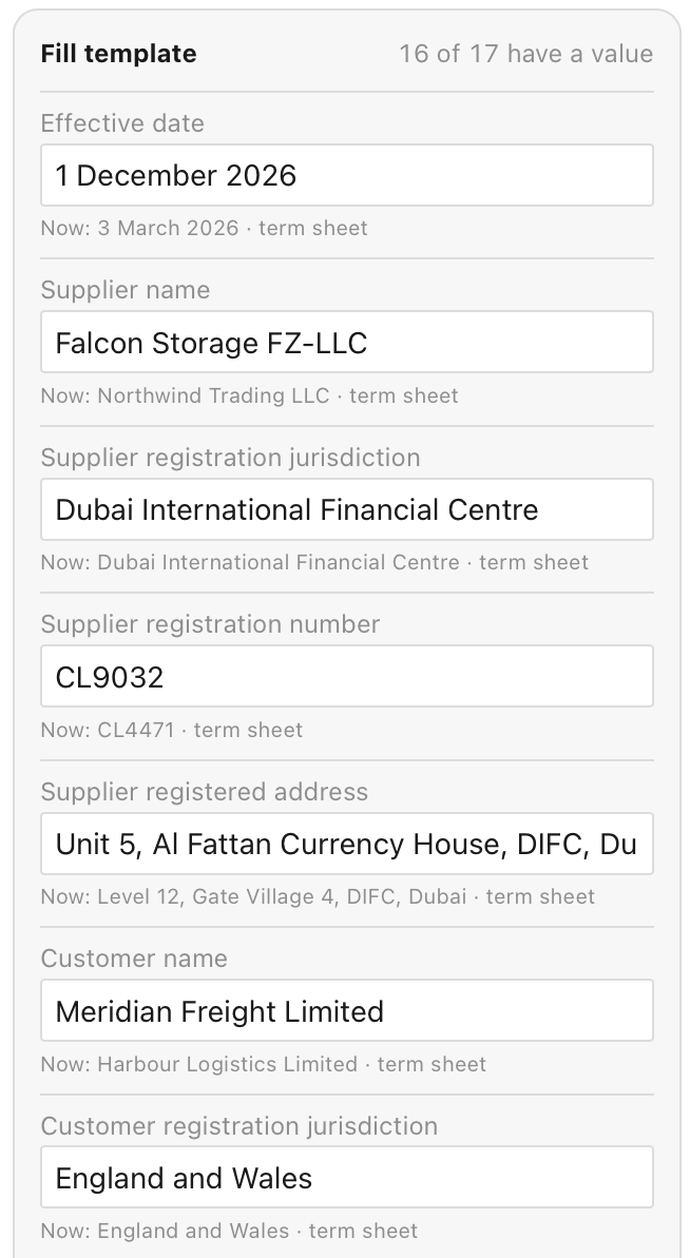
Nothing changes in the document until you click the button on the card. If Track Changes is on, each new value shows as a tracked change. A field that already holds the same value is left alone.
Limits:
- Fill fields works on fields only. It does not fill a blank line or a placeholder in square brackets, such as
[Party Name]. Ask the assistant in Redline mode to fill those. - The assistant chooses the fields and reads the values, so check both cards before you click.
- A value replaces the whole field. Words that must stay around it, such as "per annum", belong outside the field.
- Fields are made in the main text only, not in headers, footers or text boxes.
Redacted Copy
Redacted Copy makes a copy of the open document without the details that identify the parties or the deal. Use it to share a contract as a sample or a precedent. The open document does not change.
- Click Redacted Copy, then Find details. The assistant reads the document and the chat shows a Redacted copy card.
- Each row is one detail: a party name, a person, an address, a registration number, an email or an amount. The box under it holds the text that takes its place, such as
[Party A]. - Clear the tick box of each detail you want to keep. Change a replacement in its box if you want other wording.
- Click Create redacted copy. The copy opens in a new Word window. The card says how many details it replaced, and lists any detail it did not find or that is still in the copy.
- Read the copy, then save it under a neutral file name.
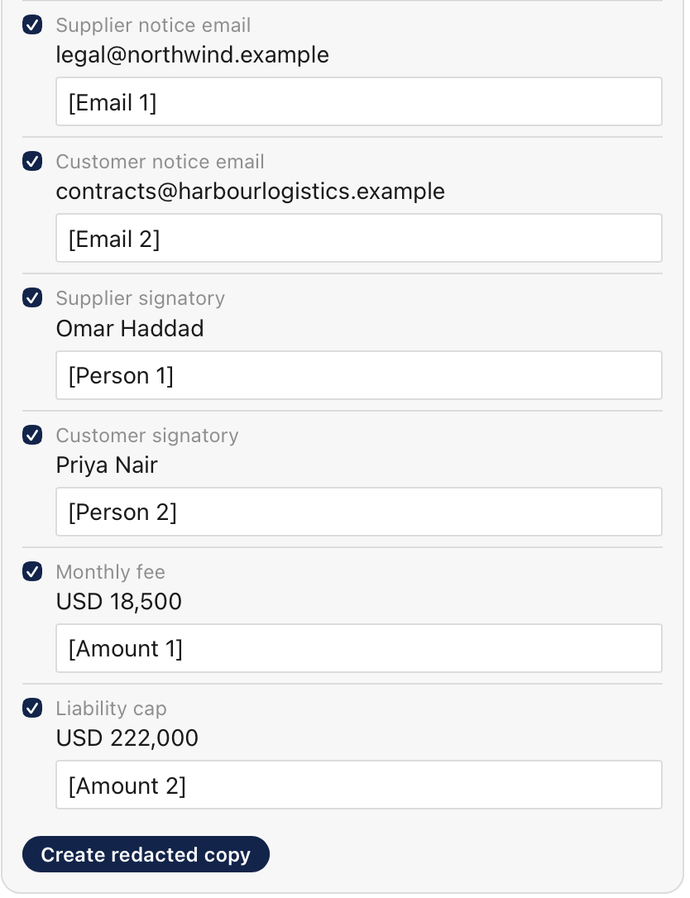
In the copy:
- Each detail is replaced everywhere it stands, in any mix of capital and small letters: in the main text, headers, footers, footnotes and endnotes.
- Tracked changes are accepted and comments are removed, so the old wording is not kept anywhere.
- The title, author, manager and company of the file are empty.
Limits:
- The assistant chooses the details from the main text. It does not read headers and footers, so a reference number that stands only in a footer stays. Check these in the copy.
- Text in pictures and text boxes is not changed.
- Word suggests a file name from the original, and writes your name as the last author when you save. Give the copy a neutral name. To keep your name out, turn on Remove personal information from this file on save in Word before you save.
- Redacted Copy needs Word for Windows or Mac. It does not work in Word on the web.
Other tools
| Group | Tools |
|---|---|
| Contract Tools | Fix Numbering Sequence, Auto Detect Headings, Insert / Update Table of Contents, Auto Cross-Reference |
| Headings & References | Apply Heading 1, Apply Heading 2, Apply Heading 3, Mark Reference Target, Link to Reference |
| Tables & Lists | Table to Text, Convert List to Text, Start Numbering List |
| Indentation & Spacing | Justify All Body Text, Fix Indentation, Sync Horizontal Spacing, Sync H1 After Space, Remove First Line Indents, Remove Left Indents, Remove Right Indents, Remove All Indents, Standardize Vertical Spacing |
| Cleanup | Remove Pictures, Remove Page Breaks, Remove Column Breaks, Clean Extra Spaces & Tabs, Remove Empty Lines |
| Endnotes | Convert Endnotes to Text |
Hold the pointer over a tool to read what it does.
Run Auto Detect Headings before Fix Numbering Sequence, so sibling headings number correctly.
Sync Horizontal Spacing and Sync H1 After Space use the paragraph you selected as the example. Select it first.
To link text to a heading by hand, select the heading and click Mark Reference Target. Then select the text and click Link to Reference.
Some of these tools are also on the LinkinLegal tab of the Word ribbon, such as Table to Text and Remove Pictures.
Some tools cannot be reverted from the pane
If a tool shows no Revert button, use Undo in Word. Run clean-up tools such as Remove Pictures on a copy if you are unsure.